Showing posts with label raynox. Show all posts

Wednesday, 19 April 2023

Focus stacked 3D Stereo pair images - A possible game changer for macro photography?

  After joining the Allan Walls macro community I became aware of stereo imaging due to a challenge being set and a great introductory tutorial. So I threw myself into a new challenge as its just the type of photography I can do from home when Im not managing to do much.

To start with I tried photographing 3 focus stacks of the same subject - ( a taxidermy insect specimen or flower) where I rotated the subject aprox 4-8 degrees between the stacks. When viewed side by side this should produce a 3D image and I was pleasantly surprised when my results paid off very quickly. Although at first I was unaware that if the images are placed in the wrong order the 3D image can appear as if its going away from you rather that the  goal of it coming towards you. 


Now getting everything prepared, set up, lighting right, the focus stacking done correctly, then the lengthy process of stacking images in appropriate software followed by finely detailed editing to ensure each image is edited precisely the same is not for the faint hearted. I have had to learn about taxidermy insect specimens, where to obtain them, how to clean and relax and position them, followed by the fiddly process of setting them up for photos. Then the lighting  can take time as many of these subjects can be super shiny, requiring several layers of diffusion material to avoid specular highlights, plus mini reflectors made from foil to lighten up the areas light doesnt reach. All this within a very tight space, often with the lens within  inches of the subject.


I have now changed from using Michaels Z6 and using my own Sony A7iii on my new WeMacro automated rail which I do prefer for focus stacking - this is controlled on my phone. I feel that almost all my focus stacking works well with this set up, where previously I often had errors in the stacks.

I am using a variety of lens but mostly my Sony 90mm macro lens, sometimes with extension tubes, and sometimes with a Raynox 250. My other main choice of lens is my new Canon MPE 65 MPE, which is taking a bit of getting use to, but is giving me great results. This requires an adapter to fit my camera and I have had some minor issues with connectivity, but Im persevering.


Now that I have had a couple of months practicing the techniques I think Im ready to attempt getting more adventurous with my set ups and will try to add in more depth, using both insects and layers of flowers. Ultimately I want to do this to give lots of depth and interest, loads of details but whilst retaining some of the out of focus bokeh that I love. So its a journey to see what I can create. 


If you are new to stereo photography I will warn you that not everyone is able to view these easily, some people can only see the 3D image with a 3D stereoscopic viewer. I'm very lucky, I can easily defocus my eyes and see most stereo pairs within seconds.  At first I found that crossing my eyes and bringing the images closer to my eyes then very slowly moving the images away, helped me to see the 3D version. Sometimes I find it easier on my computer, sometimes on my phone. 


What I love is seeing macro images that 2-5x life size as stereo pairs as these show depth and detail like I have not seen before, this excites me and is what is pushing me to create more.

I have since come across Brian May's website where I am learning a bit more about this genre, here he encourages people to try creating stereo pairs using mobile phones and a dedicated app - something I intend to try soon. I have purchased a pair of his owl viewers but neither my partner nor I can see the stereo images using these. His websites contain many other useful links and I am working my way through these to learn more. I've not found many photographers using this technique in focus stacking macro photos, but hoping to soon as it will be good to connect with more who are interested in it. 
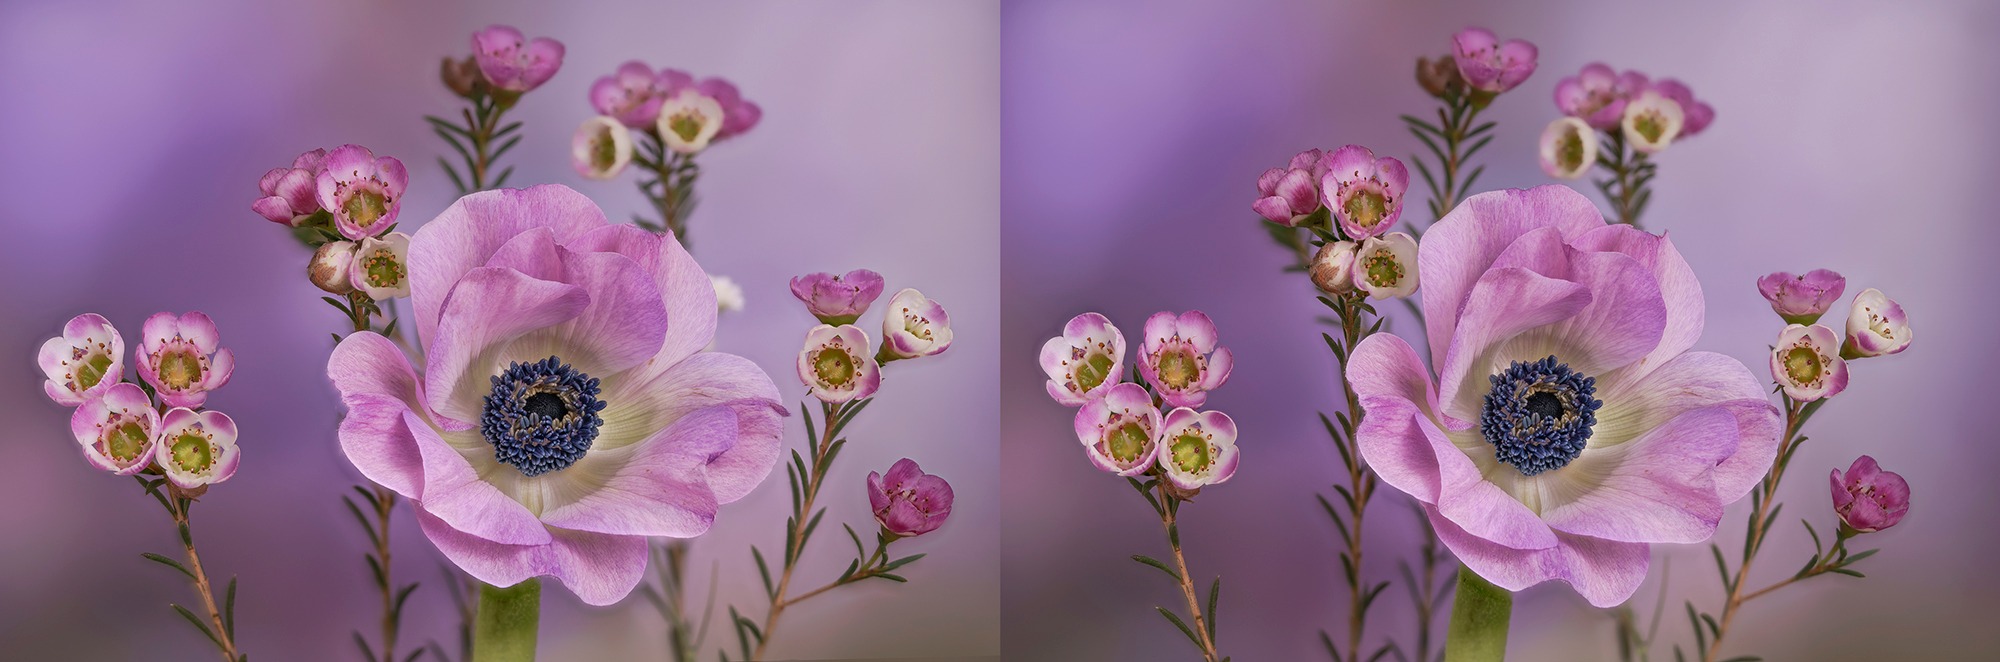

As for editing the pairs of focus stacked images - this can take hours if the insects are not pristine. If they are not edited identically this can throw off the stereo effect and it just wont work properly.

Watch this space for more this year as its a project I intend to work on all year. I would love to hear your thoughts on this project and any suggestion in the comments or in a message on social media. - EDIT a couple of days after writing this someone suggested that it may be easier for people to view the 3D images if I presented them as 3 images and yes, more people who could not see the 3D version with two images can now see them for the first time. So at the bottom I have added the triple image versions. 


Sunday, 14 February 2021

Lockdown photography part 4 - focus stacking macro work

My Focus stacking journey 

  I have always been drawn to extreme macro photography images, revelling in their fantastic intricate details and the ability to view magnified subjects that we cant truly appreciate by eye at life size. Things like a butterflies wing, the eye of a bee or fly, the refraction of a flower within a water droplet, a snowflake. I also love to see the world from different points of view - getting down low amongst foliage to capture mushrooms, insects, flowers and a more recent interest - slime moulds. I enjoy experimenting with a wide variety of techniques from using vintage lenses like Helios and Meyer Gorlitz Primoplan, filters such as Lensbaby Omni filters or crystals, sparkling fibres, shooting through items like gauze - the list is endless. I always try all techniques in macro and close up and I focus stacking macro/extreme macro has been on my to do list for ages.

One of my first ever stacked images - taken March 2009 - droplets on a peacock feather using a Canon 300D and Canon 60mm lens


Below- Another of my early stacked images of droplet refractions taken using Canon 300D plus Canon 60mm macro lens and possible macro filter added. June 2009


Below is a handheld stack of about ten images obtained using a Sony A7ii plus Sony 90mm macro lens plus 32mm extension tubes plus Raynox 250. Jan 2021


The last time I tried focus stacking macro images must be about 10 years and I didn't exactly make a proper informed effort. Since then it has been something I have fancied trying but never got around to, partly because I did not have the equipment ( macro rail) nor a camera that takes focus shift images to stack. More recently my partner turned to focus stacking macro images and is building up his equipment and set ups. So I ended up borrowing one of his macro rails which allows me to take images by altering the focal plane by the turn of a dial. I don't have a camera that takes multiple images focus shifted so it was a case of getting everything set up with camera on a mini table top, sturdy tripod, ensuring my subject was placed well and would not move at all, attaching my shutter release cable to avoid any movement then taking the individual images - turning the dial on the macro rail a fraction, waiting a few seconds to ensure no movement, pressing shutter, then repeating until the whole subject was photographed. 

Below is one of my stacked images from 2012 - I manually stacked these myself in photoshop.


Focusing is key here, I had to use manual focus and took advantage of my cameras peak focusing feature so I could see which areas where in focus using my live view. But despite the painstakingly slow and careful procedure I found I was still getting the tiniest movement from adjusting the macro rail - whether this was due to my tripod as well I am unsure. So on stacking my images in Helicon software there were just too many errors/blurred sections. I found this whole method just was not precise enough with both the distance between each image and with the movement due to my set up. After numerous attempts I found I just was not getting the results I wanted. I did also try the handheld stacking method of setting my camera on high speed burst as I slowly rocked forward - this gave some reasonable results for larger macro subjects when a smaller aperture was used.

Below is an image of a Parrot waxcap mushroom - about 2 inches tall, I took just 10 images and stacked them in Helicon, with a fair bit of fixing in photoshop.


These Tulip stamens were taken with Sony A7ii plus 90mm macro lens plus 20+12 macro extension tubes, plus a Raynox 250. Each image is created by stacks of 36 or 38 images stacked in Helicon. I was using a manual focus rail here and there were a few gaps, artifacts and blurred areas that I needed to correct in photoshop, despite trying different settings with the three different rendering methods in Helicon. I was reasonably pleased with one of them but still found that the detail and accuracy was lacking - I want to produce really fine detail. Lighting wise I was using my 2 Studio lights with various diffusers/softbox/white brolly and a speedlight with a mag mod sphere to diffuse.


Below- Taken with a macro lens plus two macro extension tubes plus a Raynox 250. 18 images stacked to get the whole drop in focus. A tiny droplet on a tendril, placed in front of an Anemone.


More images from using Sony A7, Sony 90mm macro lens plus Extension tubes ( 12+20) plus Raynox 250


In the meantime my partner was constructing his own set up with a better macro rail which he attached to a piece of a heavy wooden block to help it stay stable, this kept his camera absolutely still. He also purchased a little microscope stand which adjusts height with the tiniest fraction with the turn of a wheel and gave it a diy platform for his subjects to sit on - this came with two tiny lights attached to bendy arms. Michael owns a Z6 which can be set to take up to 300 images using a focus shift system, moving the focus a miniscule amount between each one - all easily set up with just a few clicks. He purchased a few tiny continuous lights from IKEA at just £2 each, on bendy arms, allowing flexibility - these just plug into our phone charger. With a little ingenuity, a few pieces of paper, and polystyrene cups the light can be diffused. Michael was getting some fantastic results so I asked him to teach me how to use his camera and set up - he has a few different options with lenses, reversing lenses, extension tubes, Raynox filter and another super macro lens - a Componon S50mm 2,8 which he uses reversed coupled with a 70-300 lens or macro lens . Images below show my partners set ups and equipment that I borrowed ( just quick phone snaps to give an idea)


It only took a couple of attempts using Michaels kits to get the hang of it, and whilst using the tiny continuous lights works, it does not give the effects that I can obtain using multiple of camera flashes so this is an avenue I want to explore with Michaels equipment. I know I can get my studio lights and our various speedlights working with his camera, however Michael found that they only fired three times when he attempted using them with his focus stacking set up - so we need to get this working, with intervals allowing flash and triggers to recharge - although I am unsure how they will cope with 300 shots! But this is my aim lighting wise.

And a crop to show details at 100%


Above is a Tulip stamen only my 3rd attempt using Michaels camera and focus shift option, a stack of 300 images taken with my partners Z6 plus 105 macro lens, extension tubes and Raynox filter - I probably only needed about 180 images. I placed a miniature daffodil about an inch or two behind the stamen to get the lovely glowing yellows. I used F8 to get the best sharpness from the lens, which gave enough detail to aid stacking whilst still giving a blurred out of focus backdrop. Stacked in Helicon, then minimal cleaning up in photoshop.

Below is a photo of a Scarab beetle approximately 1cm across. It is a stack of 380 images stacked in Helicon. F8, ISO 400, shutter 1/5. Nikon Z6 plus 105 macro lens and extension tubes ( 29mm) plus Raynox 250 filter.


I pretty happy with the two results above, the level of detail obtained using this equipment is phenomenal. I need to learn how to get the best out of Helicon by experimenting with the 3 rendering options and altering smoothing/radius, plus I need to work on correcting and fringeing and artifacts that are produced. I may try a trial of Zerene stacking software to see how effective it is and if it produces any less fringeing etc. The option of using Michaels equipment has allowed me to improve on any results that I have been able to produce previously and I feel like I am getting closer to producing the image quality that I am after. My next steps are to practice and to work on lighting and improve in editing.

Below is the eye of a Preying mantis ( I keep them as pets and this one died of old age last year - I kept it to photograph) Unfortunately my stack stopped after 80 images so it is incomplete and something I need to retry. Equipment used is Nikon Z6 plus extension tubes, a 70-300 lens plus a reversed Componon S 50mm lens as close as I could get. Definately room for improvement, not concentrating on composition, simply practicing getting extreme macro.

 
This last image is my favourite yet, taken with Michaels camera and focus shift option, a stack of 180 images - Z6 plus 105 macro lens, extension tubes and Raynox filter, F11, ISO 400, shutter 1/15 plus 6 lights. It took hours in photoshop correcting the many minor problems from stacking in Helicon.


Saturday, 13 February 2021

Lockdown photography part 3 - Frozen bubbles plus IGPOTY placement

 I am thrilled to share the news that another of my entries into the International  Garden Photographer of the year has been placed 3rd in its category - The Beauty of plants. Last year I was able to get around a couple of local nature reserves fairly easily on my mobility scooter and immersed myself in an old hobby of mine - looking for and learning about mushrooms. This was made easier due to a few other people visiting the same main park almost daily also looking for new mushroom species and sharing finds on a social media group, we were able to all connect and direct each other to our new finds meaning we could all see so much more. I was lucky that these lovely new friends would let me know where there were varieties that were easily accessible for me and one even brought me a specimen that I had never seen before but I could not access - which we transplanted in an accessible spot nearby( other specimens were left in tact in situ). There was an abundance of mushrooms this year and this Fly agaric caught my eye with its fairy tale like appearance - I was easily seeing from 10 to 50 Fly agarics at a time and that was just within a few ft of the path, there must have been loads further into the woods. 

                                          Frozen Bubbles

I have wanted to try photographing bubbles freezing for years but either conditions have not been right or I have been unable to get out or didnt have access to a suitable outdoor space to try this. This week conditions finally provided me with the perfect opportunity - minus 4, little to no wind and a lovely sunrise to help with light plus snow. I was able to sit/kneel on our garden bench and use another platform covered in snow to blow bubbles on. Resting my camera on a steady surface helped a fair bit too. I used a Sony 90mm macro lens for these and shot mostly at F18 trying to get the whole bubble in focus - trickier that it seems with low light and then sun streaming through the bubbles at I attempted to catch the sunrise too. Next time I try this I will use a longer lens and photograph from further away. I compensated by trying to blow small bubbles once I noticed many weren't fully in focus.


I used a mixture of two parts washing up liquid, 6 parts water, 1 part glycerine and a tablespoon of sugar. Dissolve sugar and glycerine in warm water first then add the washing up liquid - try to avoid over stirring and getting bubbles on the top as this can affect your bubbles. Place in fridge or outside to cool. Apparently these work best at temperatures below minus 4 - some say minus 10. I used a straw, took deep breaths of cold air and slowly blew bubbles. This was only my first attempt so they’re not perfect and I can already think of ways to improve. Best done when there is no wind. The colder it is the quicker the bubbles freeze so it can be handy having someone blowing the bubbles for you whilst you concentrate on photographing the quickly. Although once temperatures are around minus 1-2 it was taking a couple of minutes to freeze.

I found this a great lockdown photography project and a perfect excuse to play like a big kid in the snow :) I would love to see your frozen bubble pics in the comments - do feel free to share your tips for others too. Have fun playing.


I am looking forward to trying this again as I have a few creative ideas I would like to try, I can see it being a regular winter activity Many of the bubbles will burst so perseverance is necessary - just keep trying.  There are a few different recipes for bubble mixtures out there if you google them - many include ingredients such as corn syrup or glycerine to help the bubbles last longer and sugar to help crystalize. It is important to prepare the mixture in advance and cool it to give yourself a higher success rate, so keeping a batch ready in your fridge is handy.


Chase your dreams as they can come true!

 Its been a while - 10 months since my last blog with several reasons for that. 2024 catch up My year started out great, I was enjoying play...