Showing posts with label lighting. Show all posts

Friday, 3 February 2023

2023 Off to a good start

 Well its only February and 2023 has certainly got off to a great start photography wise for me. 

Michael upgraded his equipment last year and kindly gave me his Z6 which has the fantastic focus shift feature, allowing focus stacking. He had let me use it frequently over the last couple of years, but this last month I have really concentrated on focus stacking in my mini home studio ( dining room/table). I bought a couple of insects to practice with, used some flowers and other objects too. I was directed to a fantastic macro photographer youtube channel, full of excellent videos giving information on pretty much everything you could ever need to know to get started in macro focus stacking. Namely Allan Walls photography. I ended up watching the videos most days this last few weeks and joining the new livestreams. Despite having done macro and close up photography for 17-18 years, I have learned loads through this channel and put a lot of it into practice already. 


My aims in improving with focus stacking are to use it creatively, like in the Astrantia image above, combining it with creative effects in camera, and using creative lenses. Secondly is to get more into extreme macro - such as  x2 -x 5 life size and see how I get on with that. 

Now I was really over the moon and grateful to have the opportunity to use the Z6 for focus stacking. However, I had some great news this month in winning both 1st and 2nd place in the Camera Jabber photographer of the year competition and this has allowed me to add in some extra gear ( I will also sell some as the prize - £1500 voucher to spend with MPB -  didnt have the main piece of equipment I wanted) So I treat myself to an automated focus rail - the WeMacro rail, after watching video reviews on it. This allows me to use my Sony camera and all its lenses, meaning I can get more creative. I have also got a Canon MPE 65 macro lens coming as part of my prize - this allows up to 5x life size. So I will be able to really  focus on the macro side of things this year. Im feeling super lucky and grateful in winning this competition. 


I ordered some ethically sourced taxidermy specimens to photograph and Im slowly learning how to relax them, position them and photograph them. Ive ruined most of them already, breaking feet or antennae off, but its all part of learning I guess. Above is a Giraffe beetle, quite fascinating - as so many of these insects are. Its a whole new world photographing insects.

Ive had to learn new lighting techniques to help avoid glare and hotspots on shiny subjects such as beetles and small products such a jewellery, so its a great learning experience. I've been using extra scrims and flagging more, aswell as reflecting light a lot - all techniques I use for still life - but in slightly different ways. Its not coming easy with my brain fog, but I leave everything set up constantly and often enlist Michaels brainpower when I get stuck or forget things/ cant work something out. Even photographing something that might appear simple like these beautiful earrings given to me by my daughter, has been helped by employing my new knowledge and growing macro skills. 

Ive had more exciting news this month too, I have 3 images shortlisted in the SWPP Photographer of the year awards - 2 in the macro category and one in In camera artistry. The results are out in March.

Also, I was thrilled to have an image Highly commended in the Beauty of plants category and another in the Abstract category of International garden photographer of the year. So thats a total of 6 images placed in al the categories for 2022. Its worth taking a look at their website as the winning entries are quite wonderful. My favourites are the winning portfolio by Barry WEbb of Slime moulds - something I am keen to try myself once I improve with closer focus stacking. 

Yet another competition result was with the WPE - I had completely forgotten that I had entered 3 images and was browsing the winning images when I discovered I had won first place and Gold medal in flowers and two silver medals in macro. So its been a bit of a crazy month competition wise, funnily enough I had been considering pulling back from competitions and entering less, now Im not sure. Ive stopped entering a couple, but will have a think on whether I really want to enter so many. I do enjoy entering some and it pushes me to improve. So I will likely still enter my favourite subjects of macro/close up and flowers. I have entered a bit of a fun image into Allan Walls photography's macro mineral competition and funnily enough got it highly commended with the SWPP - it wasnt a serious entry but more fun. See below.


This last week I treat myself to some of my favourite flowers - Anemones - Blue mistral and Nero, and Ive been learning how to use the WeMacro rail whilst photographing these. I have some pastel Anemones coming next week - something Ive not been able to get hold of for many years. One good thing is that it doesnt use much energy as everything sits on a tripod, so easier to capture images in a way. Ive loved getting images like the one below with the centre in focus and still lots of nicely blurred out of focus bokeh. 


So anyone following my photography will be seeing lots of beetle and flower photography popping up and hopefully will see some improvements in my macro work. 
I also have two lensbaby lenses coming as part of my prize from Camera jabber and MPB which I am excited to use in focus stacking too. Lots to keep me occupied with macro at home whilst Im not managing much physically, although I really am hoping to get out to photograph Snowdrops, Crocuses and other spring flowers asap.


Tuesday, 23 November 2021

Still life progress and success with IGPOTY

Following on from my previous blogs re Still life photography ( see July & October 2020 plus Feb 2021)

I have continued to experiment and try to develop my own take on still life photography. This year I have concentrated a lot more on lighting as well as aiming to improve compositions and coordinating the set ups that I create.  Yet again I have thoroughly enjoyed immersing myself in this genre and found it a most useful pastime during the months where we were required to stay home more during lockdown. Spurred on by my previous success of a highly commended image in IGPOTY ( International Garden photographer of the year), I yet again aimed high, hoping to get another image placed in the competition this year.

ABOVE A summer fruits and wildflower still life - using colours to pull it together

This summer I created a couple of home made Gobos out of cardboard, these are simply a piece of card with shapes cut out so the light and shade hits my background or subject the way that I want it to. I mostly used a couple with squares cut out so it appeared as if sunlight was streaming through a window that was split into squares ( apparently called a Muntin). My challenge was to light by subject in the way I wanted whilst also getting the gobo lit backdrop, all in a small room - this was EXTREMELY challenging, with all sorts of things balanced around the room to keep my Gobo in position, to block the Gobo lighting affecting my still life scene negatively, whilst using Flags to stop light bouncing in certain places and reflectors to help bounce light back into the scene etc.

Above - A simple Summer wildflower still life setting, making use of crinkled paper to go with the crinkled Poppy petals I used back/side lighting to light the Poppy petals up, allowing it to also fall on the strawberries

This year I aimed for a bit more of a themed approach to many of the still life images I created, choosing to use mostly wild flowers that most people can obtain easily, many from our own gardens.
My reasoning was to be able to pull together a portfolio of 6 images to enter into IGPOTY and as I am also considering  subjects for possible Fellowship panels I decided this could be one of two subjects I would work on this year with the Fellowship aim in mind. Last year we had decided to plant lots of wild flowers in our own garden to help wildlife and the environment, so I had access to quite a few.
 I had also built up a small collection of vases, ornaments, dried items from nature, other props plus materials to use in the fore and background.

ABOVE Using a GOBO for the lighting, a mushroom I made from Polymer clay specifically for my still life photography, adding snail shells for extra interest and textures in the vase plus muslin.


Once I had my set up created I usually found myself starting with adding my first light from behind and to one side of my subject ( even though I only had about 2-3ft of space behind) this was often using a gridded diffuser to keep it directional. This kind of created a little bit of a lift to my subjects, helping them stand out more, but keeping this light coming from the same side as my Gobo so that it would appear more natural. Once I was happy with the light hitting the back and side of my scene, I would add my second light - often through the Gobo. This light needs to be a small source so I used a speedlight, unmodified. Again, space was an issue - I only had about 1-2ft of playing room to move my light within, plus balancing the Gobo in precarious positions whilst trying to keep it outside of the scene. Sometimes I would only use this light to hit my backdrop, other times I wanted it to hit my subjects as well. Even with these two lights the whole scene was often not fully lit how I wanted. For most sets lit this way I needed to introduce reflectors to bounce light back into the shadows and/or a 3rd light. My 3rd light was usually modified with a white shoot through umbrella pointed away from the scene and towards the white ceiling or walls to bounce just a small amount of light in to lighten the whole scene slightly, reducing shadows too. With all the lights it is crucial to note if any are causing unwanted reflections or glare off any shiny, wet, metallic or glass item which can be distracting. In the middle image below you can see a distracting glare on the jug caused by introducing a 2nd light, this was easily resolved by moving the muslin material. Another way to help reduce glare is spraying hairspray or specialised photography spray on the surface - I use a very light spray of dry shampoo sometimes. The series below is an example of how things can progress as I build lighting and sets/composition.


ABOVE Using grasses and root vegetables, I liked the colours, shapes and textures so tried to make the most of those with my lighting.

Looking back on last years images compared to this years, I can really see a difference in my approach. Now I am using lighting to focus attention on the details that I want to stand out - at least in many of the images. I will also take a lot more time in creating a set, putting a lot of thought into what subjects I want to use and why, the composition and relationship of the items to each other, the textures, colours, shapes, vessels, materials, background. I am paying attention to the tiniest of details and can sit in our dining room / mini makeshift studio contemplating my scene, changing things around and altering lighting for long periods of time, often leaving it and returning to the project the following day. This suits me nicely, having so little energy, I can spend just a few minutes at a time faffing and rest, there is no rush as little will change over the course of a couple of days providing my flowers are watered and kept well. 

ABOVE This image demonstrates for me how my approach to lighting has changed, taken last year, it was one of images I was most happy with then. It is pleasing enough but I think i could improve on it so much now by changing the lighting. Never the less it still did well in two competitions. NOTE I used dry shampoo sprayed on the pewter vase to reduce glare in this one.

After playing around with all the points mentioned above, I did manage to pull together a portfolio of 6 images which I have entered into IGPOTY Portfolio category this year and will eagerly await the results - usually announced in February the following year. I did also enter a few single images into the IGPOTY Still Life category and I was thrilled to at first discover that I had 7 images shortlisted. I was even more overjoyed when the winners were announced! 

Imagine my delight when I logged on to the winners gallery and saw one of my images at the top of the page in first place! I was quite surprised and even more taken aback as I scrolled down the winning images to learn that I had images awarded 3rd place, finalist, highly commended and 2 commended!!!!
I was in complete shock - 6!!! images placed in that one category and the overall winning image! I still find it hard to believe. It just goes to show what can be achieved from messing around in your dining room, using flowers that many consider to be weeds. I hope my results might inspire others to try out different genres and entering competitions, if I can manage this as an unwell, disabled person then Im sure most others can too. So here are my winning images :)  IGPOTY STILL LIFE WINNERS

Watch this blog to see how my portfolio does in the competition and to see how I progress in pulling together a possible Fellowship panel ( also see my next blog on Fungi photography - the other subject I have concentrated on for a possible panel and entered into IGPOTY)


Friday, 26 February 2021

Plant and Fungi POTY, SWPP

 Tonight I was awarded Plant and Fungi photographer of the year 2020, from the SWPP, with this being the winning image. Im over the moon.


It was actually a lot of work getting this shot, travelling into woods on a mobility scooter, it was a nightmare getting to the spot. I took a mat to lie down on and LED light panels which I had to prop up using various sticks due to the lay of the land surrounding it. It was a battle to stop glare on the cap, being a slimy mushroom ( a Blue roundhead) , despite using a polarising filter to help. I ad to clean the mushroom stem with a tiny soft brush to remove specks of dirt, and remove distracting leaves and vegetation from surrounding area. I set up using a mini tripod with ballhead, but it was still difficult getting in the right position due to a .slope and the fact that the tripod is fixed size. I used my Sony A7ii plus a Sigma 150 macro lens and adapter. I had to manually focus using peak focusing as it was dark in the woods. I used ISO 50 to keep noise to a minimum, F10 to get the whole mushroom in focus yet still get bokeh from trees and shutter of 1/13 sec - utilising a shutter release cable to avoid any movement. I had one LED balanced but had to hold a second in place due to awkward location.

Here are other images taken at the same session.


Sunday, 21 February 2021

Lockdown photography part 5 - In camera Double exposures

 I have been keen on trying double exposures or multiple exposures in camera for a while, but did not have the option on my camera. I recently discovered that there is a downloadable app for my camera (Sony A7ii)) from Sonys website Play Memories that allows double exposures in camera, so promptly downloaded it at a small cost of £3.99.


I was feeling quite excited at using this option because it would allow me to pull together two aspects that I love in one image - firstly getting my main macro subject mostly in focus ( By shooting at F11-18 and using good lighting) whilst adding the soap bubble bokeh ( from a Meyer Gorlitze primoplan lens) which is best achieved wide open at F1.9 with backlighting. The weather outside was murky, dull lighting with winds that would move my subject so I opted to attempt setting up on my dining table rather than in the garden.


 There were several obstacles including having to create my own backgrounds, naturalish look, backlighting to produce the bokeh that I love from the Primoplan lens, then getting the two images to work well together. Plus working at macro photography meant having to be very precise. Then I got silly and decided to photograph a moving subject - my Orchid mantids on tiny spring flowers - giving myself an extra challenge - but then I do love a challenge and both mantids appeared content to explore or preen themselves. I like the option of using current spring blooms for this project with snowdrops, crocuses, mini daffodils and Grape Hyacinths all in bloom this last few weeks.

 The image below has a very light bokeh and I found this was the result with many of my images - using the "screen" mode.

 I did try a few options - using two Primoplan images, or combining one with either a 90mm macro lens shot or a Sigma 150mm macro capture. I was constantly forgetting to change my settings ( switch off flash between images and alter aperture as I was having a major brain fog day  - but kept trying. It was also a good exercise in learning what distances are best in producing the specific bokeh from the Primoplan lens - often it is difficult to find the correct distances in that single image - so you can see why I was keen on double exposures to produce what I wanted.

 The image below was from two Primoplan exposures, one of the snowdrop alone then another of some out of focus Hyacinths covered in water droplets, plus a few more images taken using this method.


I could not resist trying this out with my Red eyed tree frogs using one of my latest backgrounds in red, plus a red flower captured with studio lights at F14 using a Sony 90mm macro lens, with the second image being of the flower covered in water drops photographed with the primoplan lens and macro extension tubes, using led back lighting. 

 The double exposure app has a few different features which I still need to experiment with such as the mirror option used below on my partner whilst he was eating breakfast :D - ( sorry not sorry lol) 


Then there is the soft focus choice which I have yet to try, plus  the reflection and the silhouette possibilities. There is a manual alternative where you can try 6 different blending modes too, viewing the previewed result prior to pressing the shutter.
Below is a quick effort using the silhouette action, my first image was houses out the back and the second one simply plant pots in the garden - nothing particularly creative but an exercise to demonstrate the effect.


Another attempt using the silhouette version resulted in a strange appearance, maybe as the subject was light and background dark - it gave a sort of opposite silhouette look.

 Many cameras do have double exposure or multiple exposure options and some that dont do have an app that can be updated to your camera. Even if yours does not, there are phone apps that can also be used to great effect - so worth looking into and another fun activity to try out whilst we are restricted in leaving our homes. Whilst it is fun to be actually taking the photos and obtaining in camera double exposure, don't forget to try producing these in photoshop by bringing together two images and simply changing blending mode and opacity. I would love to see your double exposures in the comments.

Below is a quick blend of two of my images in photoshop as an example, it was as simple as pasting in the second photo and scrolling through the blend modes to see which looked best, and thats it. 


Sunday, 14 February 2021

Lockdown photography part 4 - focus stacking macro work

My Focus stacking journey 

  I have always been drawn to extreme macro photography images, revelling in their fantastic intricate details and the ability to view magnified subjects that we cant truly appreciate by eye at life size. Things like a butterflies wing, the eye of a bee or fly, the refraction of a flower within a water droplet, a snowflake. I also love to see the world from different points of view - getting down low amongst foliage to capture mushrooms, insects, flowers and a more recent interest - slime moulds. I enjoy experimenting with a wide variety of techniques from using vintage lenses like Helios and Meyer Gorlitz Primoplan, filters such as Lensbaby Omni filters or crystals, sparkling fibres, shooting through items like gauze - the list is endless. I always try all techniques in macro and close up and I focus stacking macro/extreme macro has been on my to do list for ages.

One of my first ever stacked images - taken March 2009 - droplets on a peacock feather using a Canon 300D and Canon 60mm lens


Below- Another of my early stacked images of droplet refractions taken using Canon 300D plus Canon 60mm macro lens and possible macro filter added. June 2009


Below is a handheld stack of about ten images obtained using a Sony A7ii plus Sony 90mm macro lens plus 32mm extension tubes plus Raynox 250. Jan 2021


The last time I tried focus stacking macro images must be about 10 years and I didn't exactly make a proper informed effort. Since then it has been something I have fancied trying but never got around to, partly because I did not have the equipment ( macro rail) nor a camera that takes focus shift images to stack. More recently my partner turned to focus stacking macro images and is building up his equipment and set ups. So I ended up borrowing one of his macro rails which allows me to take images by altering the focal plane by the turn of a dial. I don't have a camera that takes multiple images focus shifted so it was a case of getting everything set up with camera on a mini table top, sturdy tripod, ensuring my subject was placed well and would not move at all, attaching my shutter release cable to avoid any movement then taking the individual images - turning the dial on the macro rail a fraction, waiting a few seconds to ensure no movement, pressing shutter, then repeating until the whole subject was photographed. 

Below is one of my stacked images from 2012 - I manually stacked these myself in photoshop.


Focusing is key here, I had to use manual focus and took advantage of my cameras peak focusing feature so I could see which areas where in focus using my live view. But despite the painstakingly slow and careful procedure I found I was still getting the tiniest movement from adjusting the macro rail - whether this was due to my tripod as well I am unsure. So on stacking my images in Helicon software there were just too many errors/blurred sections. I found this whole method just was not precise enough with both the distance between each image and with the movement due to my set up. After numerous attempts I found I just was not getting the results I wanted. I did also try the handheld stacking method of setting my camera on high speed burst as I slowly rocked forward - this gave some reasonable results for larger macro subjects when a smaller aperture was used.

Below is an image of a Parrot waxcap mushroom - about 2 inches tall, I took just 10 images and stacked them in Helicon, with a fair bit of fixing in photoshop.


These Tulip stamens were taken with Sony A7ii plus 90mm macro lens plus 20+12 macro extension tubes, plus a Raynox 250. Each image is created by stacks of 36 or 38 images stacked in Helicon. I was using a manual focus rail here and there were a few gaps, artifacts and blurred areas that I needed to correct in photoshop, despite trying different settings with the three different rendering methods in Helicon. I was reasonably pleased with one of them but still found that the detail and accuracy was lacking - I want to produce really fine detail. Lighting wise I was using my 2 Studio lights with various diffusers/softbox/white brolly and a speedlight with a mag mod sphere to diffuse.


Below- Taken with a macro lens plus two macro extension tubes plus a Raynox 250. 18 images stacked to get the whole drop in focus. A tiny droplet on a tendril, placed in front of an Anemone.


More images from using Sony A7, Sony 90mm macro lens plus Extension tubes ( 12+20) plus Raynox 250


In the meantime my partner was constructing his own set up with a better macro rail which he attached to a piece of a heavy wooden block to help it stay stable, this kept his camera absolutely still. He also purchased a little microscope stand which adjusts height with the tiniest fraction with the turn of a wheel and gave it a diy platform for his subjects to sit on - this came with two tiny lights attached to bendy arms. Michael owns a Z6 which can be set to take up to 300 images using a focus shift system, moving the focus a miniscule amount between each one - all easily set up with just a few clicks. He purchased a few tiny continuous lights from IKEA at just £2 each, on bendy arms, allowing flexibility - these just plug into our phone charger. With a little ingenuity, a few pieces of paper, and polystyrene cups the light can be diffused. Michael was getting some fantastic results so I asked him to teach me how to use his camera and set up - he has a few different options with lenses, reversing lenses, extension tubes, Raynox filter and another super macro lens - a Componon S50mm 2,8 which he uses reversed coupled with a 70-300 lens or macro lens . Images below show my partners set ups and equipment that I borrowed ( just quick phone snaps to give an idea)


It only took a couple of attempts using Michaels kits to get the hang of it, and whilst using the tiny continuous lights works, it does not give the effects that I can obtain using multiple of camera flashes so this is an avenue I want to explore with Michaels equipment. I know I can get my studio lights and our various speedlights working with his camera, however Michael found that they only fired three times when he attempted using them with his focus stacking set up - so we need to get this working, with intervals allowing flash and triggers to recharge - although I am unsure how they will cope with 300 shots! But this is my aim lighting wise.

And a crop to show details at 100%


Above is a Tulip stamen only my 3rd attempt using Michaels camera and focus shift option, a stack of 300 images taken with my partners Z6 plus 105 macro lens, extension tubes and Raynox filter - I probably only needed about 180 images. I placed a miniature daffodil about an inch or two behind the stamen to get the lovely glowing yellows. I used F8 to get the best sharpness from the lens, which gave enough detail to aid stacking whilst still giving a blurred out of focus backdrop. Stacked in Helicon, then minimal cleaning up in photoshop.

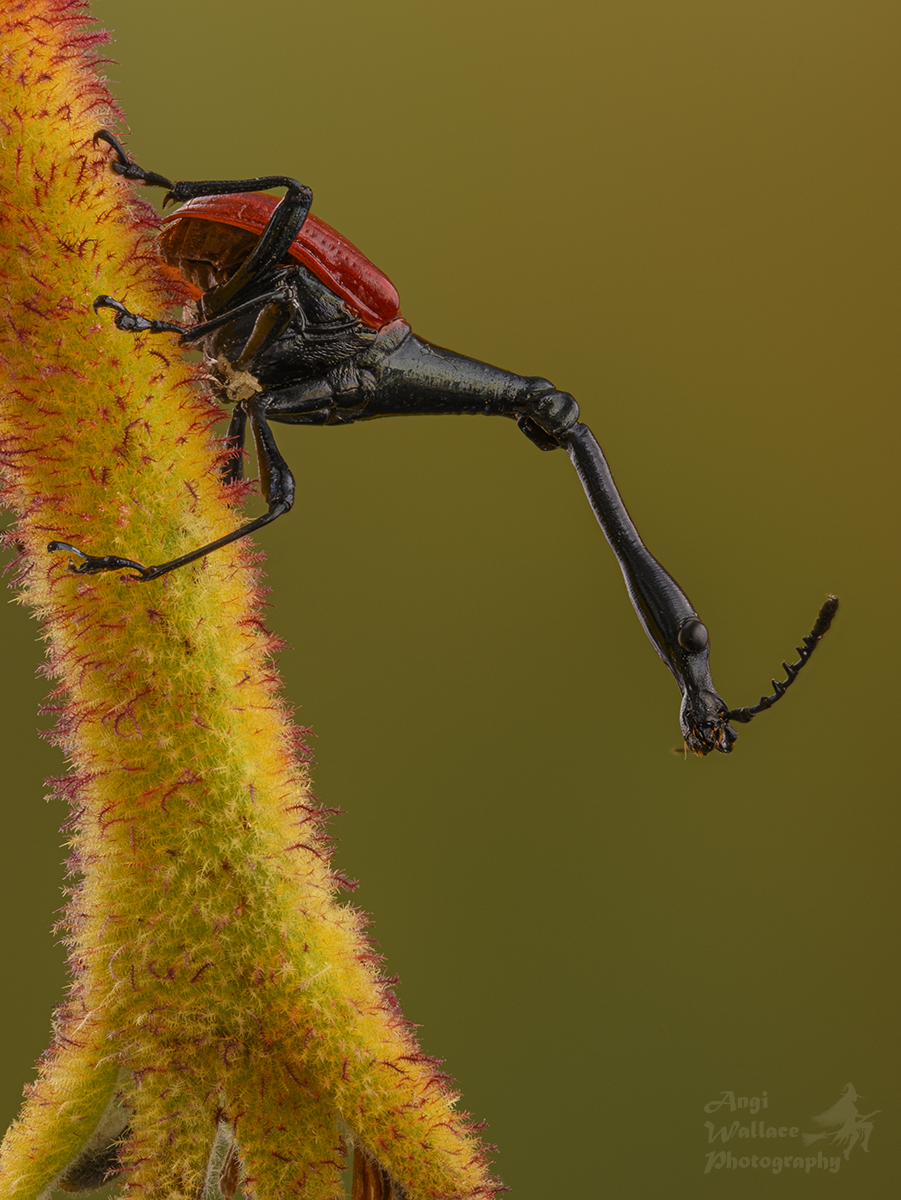
Below is a photo of a Scarab beetle approximately 1cm across. It is a stack of 380 images stacked in Helicon. F8, ISO 400, shutter 1/5. Nikon Z6 plus 105 macro lens and extension tubes ( 29mm) plus Raynox 250 filter.


I pretty happy with the two results above, the level of detail obtained using this equipment is phenomenal. I need to learn how to get the best out of Helicon by experimenting with the 3 rendering options and altering smoothing/radius, plus I need to work on correcting and fringeing and artifacts that are produced. I may try a trial of Zerene stacking software to see how effective it is and if it produces any less fringeing etc. The option of using Michaels equipment has allowed me to improve on any results that I have been able to produce previously and I feel like I am getting closer to producing the image quality that I am after. My next steps are to practice and to work on lighting and improve in editing.

Below is the eye of a Preying mantis ( I keep them as pets and this one died of old age last year - I kept it to photograph) Unfortunately my stack stopped after 80 images so it is incomplete and something I need to retry. Equipment used is Nikon Z6 plus extension tubes, a 70-300 lens plus a reversed Componon S 50mm lens as close as I could get. Definately room for improvement, not concentrating on composition, simply practicing getting extreme macro.

 
This last image is my favourite yet, taken with Michaels camera and focus shift option, a stack of 180 images - Z6 plus 105 macro lens, extension tubes and Raynox filter, F11, ISO 400, shutter 1/15 plus 6 lights. It took hours in photoshop correcting the many minor problems from stacking in Helicon.


Chase your dreams as they can come true!

 Its been a while - 10 months since my last blog with several reasons for that. 2024 catch up My year started out great, I was enjoying play...