Showing posts with label floral art. Show all posts

Friday, 3 February 2023

2023 Off to a good start

 Well its only February and 2023 has certainly got off to a great start photography wise for me. 

Michael upgraded his equipment last year and kindly gave me his Z6 which has the fantastic focus shift feature, allowing focus stacking. He had let me use it frequently over the last couple of years, but this last month I have really concentrated on focus stacking in my mini home studio ( dining room/table). I bought a couple of insects to practice with, used some flowers and other objects too. I was directed to a fantastic macro photographer youtube channel, full of excellent videos giving information on pretty much everything you could ever need to know to get started in macro focus stacking. Namely Allan Walls photography. I ended up watching the videos most days this last few weeks and joining the new livestreams. Despite having done macro and close up photography for 17-18 years, I have learned loads through this channel and put a lot of it into practice already. 


My aims in improving with focus stacking are to use it creatively, like in the Astrantia image above, combining it with creative effects in camera, and using creative lenses. Secondly is to get more into extreme macro - such as  x2 -x 5 life size and see how I get on with that. 

Now I was really over the moon and grateful to have the opportunity to use the Z6 for focus stacking. However, I had some great news this month in winning both 1st and 2nd place in the Camera Jabber photographer of the year competition and this has allowed me to add in some extra gear ( I will also sell some as the prize - £1500 voucher to spend with MPB -  didnt have the main piece of equipment I wanted) So I treat myself to an automated focus rail - the WeMacro rail, after watching video reviews on it. This allows me to use my Sony camera and all its lenses, meaning I can get more creative. I have also got a Canon MPE 65 macro lens coming as part of my prize - this allows up to 5x life size. So I will be able to really  focus on the macro side of things this year. Im feeling super lucky and grateful in winning this competition. 


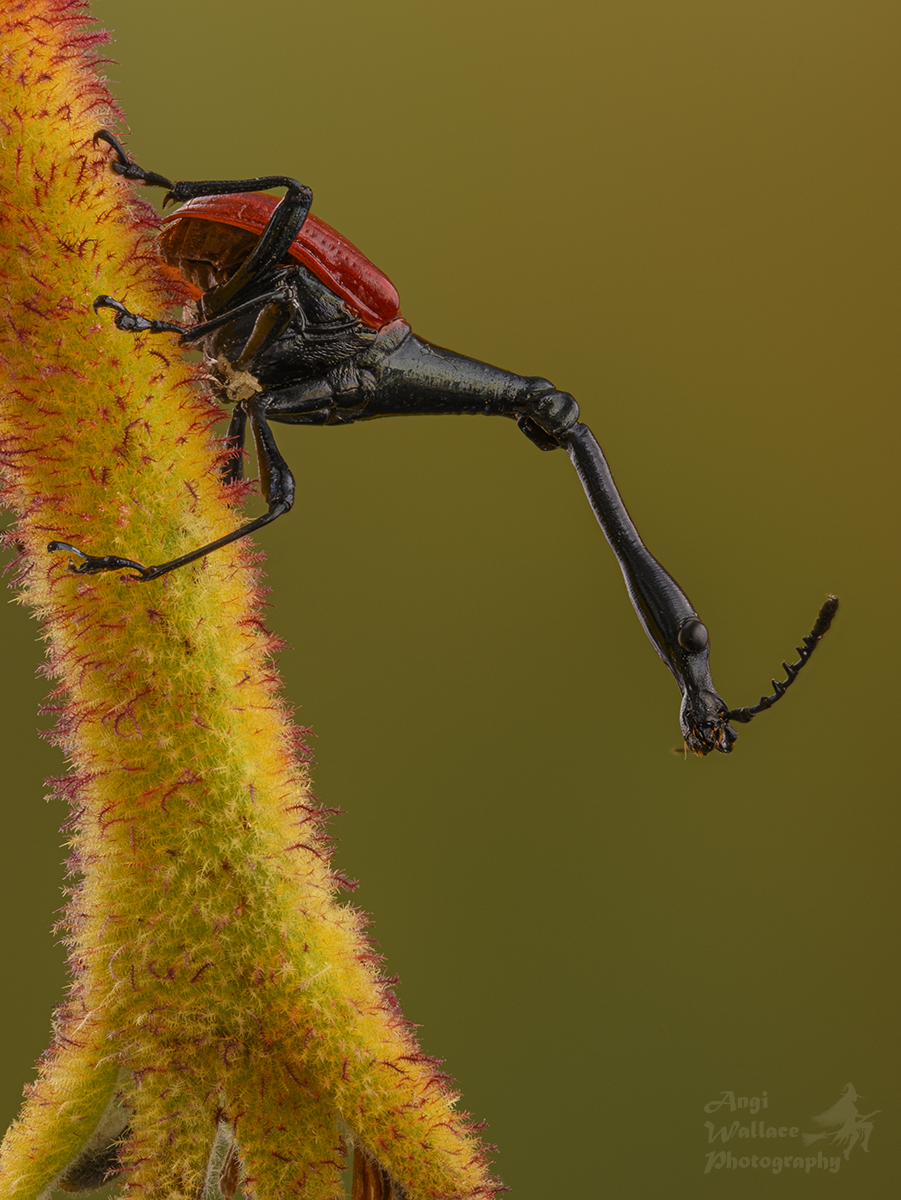
I ordered some ethically sourced taxidermy specimens to photograph and Im slowly learning how to relax them, position them and photograph them. Ive ruined most of them already, breaking feet or antennae off, but its all part of learning I guess. Above is a Giraffe beetle, quite fascinating - as so many of these insects are. Its a whole new world photographing insects.

Ive had to learn new lighting techniques to help avoid glare and hotspots on shiny subjects such as beetles and small products such a jewellery, so its a great learning experience. I've been using extra scrims and flagging more, aswell as reflecting light a lot - all techniques I use for still life - but in slightly different ways. Its not coming easy with my brain fog, but I leave everything set up constantly and often enlist Michaels brainpower when I get stuck or forget things/ cant work something out. Even photographing something that might appear simple like these beautiful earrings given to me by my daughter, has been helped by employing my new knowledge and growing macro skills. 

Ive had more exciting news this month too, I have 3 images shortlisted in the SWPP Photographer of the year awards - 2 in the macro category and one in In camera artistry. The results are out in March.

Also, I was thrilled to have an image Highly commended in the Beauty of plants category and another in the Abstract category of International garden photographer of the year. So thats a total of 6 images placed in al the categories for 2022. Its worth taking a look at their website as the winning entries are quite wonderful. My favourites are the winning portfolio by Barry WEbb of Slime moulds - something I am keen to try myself once I improve with closer focus stacking. 

Yet another competition result was with the WPE - I had completely forgotten that I had entered 3 images and was browsing the winning images when I discovered I had won first place and Gold medal in flowers and two silver medals in macro. So its been a bit of a crazy month competition wise, funnily enough I had been considering pulling back from competitions and entering less, now Im not sure. Ive stopped entering a couple, but will have a think on whether I really want to enter so many. I do enjoy entering some and it pushes me to improve. So I will likely still enter my favourite subjects of macro/close up and flowers. I have entered a bit of a fun image into Allan Walls photography's macro mineral competition and funnily enough got it highly commended with the SWPP - it wasnt a serious entry but more fun. See below.


This last week I treat myself to some of my favourite flowers - Anemones - Blue mistral and Nero, and Ive been learning how to use the WeMacro rail whilst photographing these. I have some pastel Anemones coming next week - something Ive not been able to get hold of for many years. One good thing is that it doesnt use much energy as everything sits on a tripod, so easier to capture images in a way. Ive loved getting images like the one below with the centre in focus and still lots of nicely blurred out of focus bokeh. 


So anyone following my photography will be seeing lots of beetle and flower photography popping up and hopefully will see some improvements in my macro work. 
I also have two lensbaby lenses coming as part of my prize from Camera jabber and MPB which I am excited to use in focus stacking too. Lots to keep me occupied with macro at home whilst Im not managing much physically, although I really am hoping to get out to photograph Snowdrops, Crocuses and other spring flowers asap.




Thursday, 4 March 2021

Textures how to use them and how to make them

  I adore seeing images with painterly, ethereal appearances, where photographs and textures are carefully meshed together to create a masterpiece. I have dabbled with using textures in my imagery ever since I started getting into photography. Firstly, the son of a friend helped me to learn how to create digital signature images  for use on internet forums around 18 years ago. After this I practiced blending layers together to create signatures tailored to individuals, then moved on to creating textures for my photographs. 

 Below are a couple of  my old photographs where I first used textures. You can see they are quite basic, but the sunflower one remains an old favourite. These are both from around 2008.


The next images show how my blending and layering techniques evolved over the following years as I learned from fellow photographers on Ephotozine and DeviantArt. Most of the textures I used then were free downloads off DeviantArt, Flickr, Ephotozine and similar sites.


As you can see I started out my photographic journey capturing flowers a lot, something which I have recently got back into. But I also used textures with other genres such as portraits.


 As I started entering competitions I discovered that it was important to use my own textures in my digital manipulations in images that I intended on entering to certain categories/competitions. So I started learning how to create my own textures. I first started by painting some card with watercolours then photographing those. I also photographed various textured surfaces such as walls, stone, wood, paper and manipulated these in photoshop.  I still have the painted textures and sell these as one of the texture packs that I have put together. 
 
This was one of the first textures I made, which was originally from a photograph of a stone quarry near where I lived. 


This is one of my latest texture collections - I have many available, a lot available on my Deviant art stock account A68Stock  or in my Etsy store AngiWallaceCreative Etsy store or by contacting me directly on Facebook Angi Wallace Photography,  or by email - angiwallace@live.co.uk


This image of a Crocus was created with just one of my own textures, I altered the colour of the texture to get the glowing blue/lilac colour that I wanted.


So how do I use textures? 
If new to textures - To use in photoshop ( Ive started with basic simple instructions for those who are new to using textures)
Open the photo or artwork you wish to apply your texture to
Then also open the texture you wish to apply, with this texture open click on Select then All, then click on Edit at the top of your work space and choose copy from the list,
then go to the photo you are applying it to, go to Edit again and choose paste. Now you will see the texture appear over you photo. So below you see my original photo open in photoshop.
You should have a Layers panel open ( mine is bottom right of the screen) where you can see both layers in a panel - each layer will have an eye icon next to it for you to choose whether you want it to be visible or not. Your photo will automatically be named Background layer and the texture will be named Layer 1 unless you choose to alter the name. In this Layers panel you need to click on the texture to choose that layer - this will highlight the layer within the panel - so anything you do following this will apply to that layer.

Within the layers panel you will see a dropdown list starting with "Normal" - this list is of blending modes - in the Newest version of Photoshop you can hover over each blending mode and it will show you a preview of how that blending mode will affect the layer, each will give it a different appearance. Scroll through these and find which blending mode you prefer and click on it - it will be applied to your texture layer giving the image a different look. 

Also within the Layers panel there is an Opacity option where you can reduce the opacity of the layer for a more subtle look. I often reduce opacity.

 I find it useful to select areas of the texture, feathering it and reduce the opacity by using masks, this is particularly handy when you want a particular subject in your photo to show throw more prominently.
To start this process you will need to choose your texture layer by clicking on it in the layers panel - you will know you have done this right when the layer is highlighted in a lighter grey within the panel. Then click on the Layer mask icon  at the bottom of the Layers panel ( it is the white rectangle with dark grey circle within) When you click this a white rectangle will appear in the Layers panel next to your texture - this is your "layer mask". It will be surrounded by white corners showing you that it is selected. See below screenshot.

What is a layer mask?
Basically whatever part of your mask is white is what you can see of that layer, whatever you paint in black  using the brush tool over your image will be removed from view. So in my image I want to see the bottles and flowers with less texture on them. I start by loosely selecting the area around them using the lasso tool from the top left of your tools. Do this by drawing around your subject and you will have an area selected by flickering with dots ( often called marching ants). 
Now because this is the area we want removed and we do not want a harsh line of where texture starts and ends, we are going to feather the edges of this selection. This will help give the image a better blended appearance when finished.  So go to "Select" in the top options and scroll down to "Modify" and another few options will appear - choose"Feather". A small box will appear asking how many pixels you want to feather by. On my first layer for a full size hi res image I tend to start by feathering a lot, so chose 300 pixels for this image. type in your chosen number and press ok. The selected area surrounded by marching ants will shrink a bit. 

Next we need to fill this selected area with black. Make sure in your layers panel that the texture layer is highlighted grey and the mask has the white corners. Then from the top options choose "Edit" then "Fill". A new box will appear asking what colour - we want black. Also what percentage, I choose 50% for my first layer as I remove more in my  next layer. Then click ok. Then click Select and "Deselect to get rid of the marching ants.  
For this image I am using a normal blending mode so had my opacity reduced to enable me to see  the bottles and flowers. Now that I have masked out my first area I can change my opacity back to 100% to get an idea of how it is looking. As we can see below there is still some texture over the bottles/flowers.


Following the steps above again we select smaller areas and feather these a lot less - say 100pixels, so starting with the bottle on the left I select an area smaller than the bottle itself. ( again make sure the texture layer is selected and the mask selected before filling this area with Black at about 75% this time. Deselecting and repeating for each bottle and flower. If something is very small then feather less pixels.  Soo after masking these little areas my image looks like this below.

You could your image like this  or mask out less than I have, this is totally up to you and depends on the look that you want. But for a further step, if you want texture removed accurately or completely from some areas then choose the brush tool on the top left and choose the colour black to paint with - checking the size of brush, whether it has a hard or feathered edge and also the opacity. Making sure your texture layer and mask is still selected you can start painting over the areas you want to see more of such as the flowers, using your brush. I often start with a lower opacity and build this up.
Below is my final image and you can see my mask in the layers panel showing the darker areas of texture I removed. This is just one of the ways I apply textures. There are other approaches too. You can use several layers of textures to build up your look. You can automatically select your subject in newer versions of photoshop or use the "select and mask" option, but this can leave harsh edges between your subject and texture which may not be what you want. There are also other options for refining edges. But this is just a basic starting point for those who have asked me. Please to get in touch if you have any questions and I will try to help


Other examples of my images with my textures applied below 

I should add that I use a Wacom tablet for all editing. I find it easier to select and paint areas and find it invaluable for editing. I have used Wacom tablets for over ten years after winning one in a competition and wont be without one now. 


I have been asked many times how I produce my textures and my techniques vary. The two textures above were simply photos taken at home - Chalkboard was a photograph of a set up for still life, where I painted an old board at home with black matt paint then sponged on white and grey areas, photographed deliberately out of focus for this effect. The second one is a similar painted, textured board simply desaturated with colour changes.
I often take photos that are deliberated out of focus to use as colour wash textures or to combine with a photograph of a textured surface. 90% of my texture photos are taken at home or in the garden. For out of focus textures I can use anything from flowers, grass and foliage outside, to the sky, a glass vase, material on clothing, curtains, bedding, bokeh from fairy lights, our fish tank etc Only your imagination stops you coming up with ideas here. For surface textures I can use standard photographs or macro photos of virtually any surface in the house - cracked leather on an old seat, crinkled paper stained with coffee, marble works top/fireplace, floor tiles, carpet, various material,l leather on boots and bags, lichen on a plant pot outside, a rusty old bolt, an old baking tray, bottom of a pan, walls, bricks, any painted surface, wood. The images below are simple snaps at home that will make wonderful textures/overlays.

This one is a simple out of focus flower photo which I have already used as a backdrop of overlay.


I find that combining my photographs helps in creating new textures, using blending modes, opacity and sometimes distorting them. Another tool I use is Topaz studio software which has a whole host of options for manipulating your images, many of which can give a lovely painterly appearance. You can download a free months trial to try it out. 


If you don't have the inclination or time to create your own textures then I have lots of different texture collections for sale starting at just £8 for a collection of 9 or 10 hi res textures.
They can all be found on this website Angi Wallace Creative Textures , but unfortunately cannot be purchased there yet as I am not earning enough from them to cover the cost of using the website as a shop. If I start to sell more then I will hopefully be able to make them available this way. In the meantime please email me and I will usually respond within hours. angiwallace@live.co.uk

I hope this has been helpful and would love to see your results. 


Wednesday, 3 March 2021

Signs of spring

 I love spring, with its ever changing weather throwing snowstorms, rain showers and increasing sunshine, combining to give us rainbows, it seems unpredictable but we know that it heralds the promise of things to come. With frogs starting mating in our ponds, birds displaying comical courtship behaviour and other wildlife coming out of hibernation. The arrival of Hellebores, Snowdrops, Crocuses, Daffodils, Dwarf Irises certainly brighten up February and March for me and give me plenty to keep myself occupied whilst waiting for spring blossoms.

 This year I have discovered a new favourite Crocus -"Firefly" with its fresh colours, a sunny yellow centre and delicate pale lilac and white petals. Who could not be delighted with these?


Whilst its been less than favourable conditions outside for photographing plants in the garden ( too windy) I am taking advantage of our mini studio in the dining room and trying out the new backdrops Ive made, so spoilt for choice with the combinations between plants and backgrounds. This has resulted in experimenting with colour palettes and making some surprising discoveries on what works. 

The image below incorporated 5 of my textures/backdrop images.


Our outhouse has become a great holding zone for plants that are not quite ready to be planted out, or flowers that I am trying to make last longer in a cool room so that I can eek out as much use of them as possible. It looks like a cross between a florists and a garden centre with 3 types of Tulips, Crocus, Snowdrops, Primula, Hellebores, Lilies and more.
 So I am starting out with close ups and aim to include a few still life creations as I go. Below is a Dwarf Iris photographed against one of my new out of focus backdrops.


I actually had my 2nd trip out to a local nature reserve a few days ago, just a couple of miles away from home, so took the camera along too. Unfortunately my mobility scooter decided to choose that day to stop working, so we were not there as long as I hoped. I did capture some spring Catkins though and opted for creating  interesting bokeh with Catkin silhouettes in the sunshine. I think these work nicely in black and white too.


Another subject caught my eye as we passed Bullrushes with their brown velvety heads split, dispersing their seeds in the wind, set against a backdrop of sparkling waters. This gave further options for producing eye catching bokeh. I actually photographed these in black and white for the forms and shapes, but I think they work well in colour too.


 I recently watched a very informative webinar by Guy Edwards on fungi photography, where he explained how to achieve the silhouette shapes within bokeh - something I dabbled with last year and have attempted again, more successfully in the last week or two. This was the perfect opportunity to try the technique, you can see it in the above Catkins images and some of the images below.


 I had a brief play in the garden with the bokeh technique too, it is easier to make it work in larger outdoor spaces with bokeh through vegetation and trees though. So far it seems to work better with a longer macro lens than a shorter one, I think the blur from the item causing the silhouette is too pronounced in a shorter lens, it becomes less obvious using my 150mm. I am keen to try a longer lens to see the results. You can see from  the Grape hyacinth image below how the snowdrop used has caused quite a distracting pale blur. The bokeh was from nearby vegetation sprayed with water, hence smaller bokeh, in a larger open space where the bokeh can be further away it becomes larger, making it a bit easier.


This one is a Snakes head Fritillary using fern for the bokeh. I stuck with F2.8 for the bokeh which wasn't ideal for getting the flower fully in focus, but it was just an experiment  and there were limited options space wise and where the sun hits the garden. Definitely something I will practice more of.


Below I used my Meye Gorlitz Primoplan vintage lens plus an app on my camera which produces rays of light. With a little editing. I have added a selection of other images I have taken in the last couple of weeks.


Chase your dreams as they can come true!

 Its been a while - 10 months since my last blog with several reasons for that. 2024 catch up My year started out great, I was enjoying play...