Friday 24 December 2021

My Focus stacking journey part 2

 Back in February I wrote a little on how I was starting to try out focus stacking and ended up trying out some super close ups of an interesting beetle and other small objects such as tulip stamens. These images involved a great deal of patience and up to 300 photos per stack. Since then I moved on to using focus stacking out doors for floral and fungi images, which luckily required a lot less frames due to the nature of what I was capturing. I would say that most of my photography from late spring through to winter was centred around trying to produce floral or fungi images with a nice out of focus foreground and background whilst getting as much of the subject in focus as possible. Whilst using a longer lens helped me to achieve this on location at time, it was not always practical or possible, so this is where focus stacking came in useful. I did also try a few floral images where everything was in focus such as the lovely Red Ranunculus below which took 78 photos stacked to get this result, using the Nikon Z6 plus Sigma 105 macro lens shooting at F18 with lighting to get every tiny detail. Whilst I like it, I prefer the atmosphere and mood that a bit of shallow depth of field gives such as the next image of the same flower below where I combined a short stack shot at F10 of the centre part of the plant with a shallow depth of field shot.


For further comparison below is a single shot taken with my Sony A7ii plus Sony 90mm macro lens at F18, using studio lighting, of the same flower. Now this is my favourite of the 3 images, with the 1st shot being my least favourite.


I have also been lucky enough to have the opportunity to try focus stacking butterflies whilst they were in torpor - still asleep early in the morning - if you are very careful not to disturb them too much then sometime you get lucky and manage to photograph a full stack. Its down to luck, the temperatures and weather etc. I find the best time to photograph butterflies and most other insects in early morning, I cannot run around chasing them for photos, so Im better off slowly looking at dawn for roosting specimens.( luckily my partner enjoys photographing them too and has a knack of spotting them which is helpful). It helps if you are aware of the species that are around at different times of year and the plants/trees/habitat they prefer. For instance early spring sees the emergence of Orange tip butterflies which lay their eggs on Cuckoo flowers, as this is what their caterpillars feed on. So if you know a spot where there are Cuckoo flowers then you will increase your chances of finding them roosting nearby.

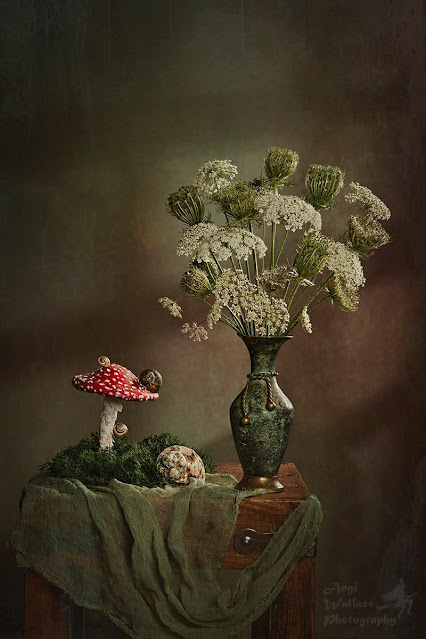
 Its worth taking along a mini tripod and also maybe a printed backdrop photo or two - just in case the surrounding area is too cluttered and buy to achieve a nice clean image. The stacked image below involved using one of my out of focus backdrops. I did find the butterflies would sometimes move their antennae or wings, or even walk around as the awaken, its just patience and luck getting a stack that is usable.


With insects, if they are still sleepy in the morning and they are not in a position to photograph, it is sometimes possible to place a more pleasing plant just in front of them and ever so gently touch their legs with it, sometimes they will sleepily step onto the new plant, but other times they will wake and fly away. I also carry a tiny pair of scissors with me so that I can snip any distracting elements of vegetation out of the way, providing its not an uncommon plant etc.  Alternatively vegetation can be held out of the way with a clamp, clip or blue tac etc, the aim is to not damage the environment.


Above is another focus stack where I have used one of my printed photographs in the background.

Below is one of my favourite focus stacked floral images this year, it took quite a bit of setting up and was achieved in our dining room, sat at the table. I used an out of focus photo in the background, placed my flowers between the camera and backdrop, then added more flowers behind the main Cyclamen flowers and a few right in front of the lens to get more or a hazy blur. It only took a stack of 18 frames to achieve and is pretty much straight out of camera other than the stacking in Helicon. It was shot at F4. 


I used the same technique for the next two aswell.


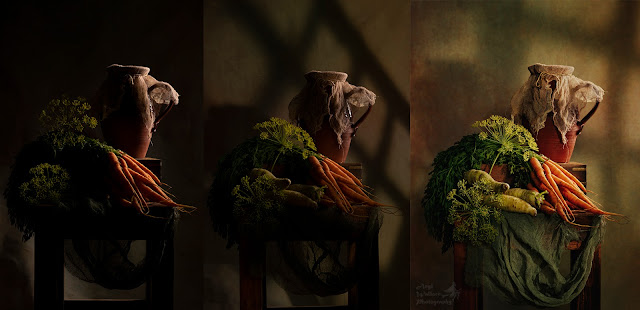
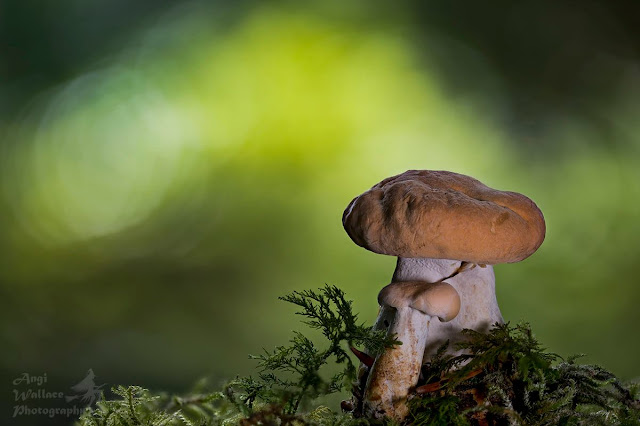
As the year progressed I started t try out focus stacking mushrooms, sometimes on location and sometimes at home, creating mini set ups in our home studio/dining room. The more I tried focus stacking on location, the more I discovered I needed extra bits and pieces to my kit, taking along small LED lights, a Gorilla pod, a mat to lie on, foil/reflector, cocktail sticks and floristry wire to help hold things in place. Even with mushrooms the wind can have a detrimental effect so I needed to avoid windy days as this did ruin a few stacks. My first few fungi attempts were at a lovely spot at Wallington hall woodlands, just off the path where I found quite an array of species and pleasing backdrops. Below are two from my first proper attempt at this location. Both required use of a stable mini tripod, a shutter release cable or use of the time function and adjustable led lights to balance against daylight. I found LED lights work better for me than flash, I can take a quick focus stack this way, minimising the chance of movement - with flash there needs to be time between each shot to allow the flash unit to recharge.


I did take some mushroom specimens home to practice on, only if they were growing in abundance and below are a couple of examples. I wanted to be able to take my time to get everything right at home and add in the faux rain aspect. Im thinking this specimen below  is Lactarius rufus due to its brick red colour and because it was growing near pines, amongst sphagnum moss at Wallington Hall NT, Northumberland. This is a focus stacked image of 80 photos at F4.2 taken on a Nikon Z6 with a 105 macro lens and circular polariser to reduce glare. I sprayed water during one photo to mimic rain.
I used one of my out of focus backgrounds behind it, plus leaves from the woodlands floor to create the foreground haze. Photographed using studio lights. I sprayed water in my final photos and only used one of these in the stack. 
After processing in Helicon I still found that there was some fringeing around my subject which I  had to fix in photoshop - not so easily done with the water droplets, but I have an easy fix for a clear background.

I used pretty much the same  set up for the Amethyst Deceivers below - a stack of 72 images


Below is another set up created at home of Waxcap mushrooms which I had to glue in place ( they are found amongst grass usually), it won a couple of Gold awards with the SWPP and NPS in the macro category.


When shooting focus stacked images outdoors I often find that the background of the final stacked image can be messy due to foliage etc moving in the wind. So once stacked in Helicon I now replace the messy background with one from a single image from the stack - usually fairly easy to do using the select object tool and masking. This also helps to remove the resulting fringeing around the subject. I used this technique in the image below as the out of focus leaves had moved substantially during my stack.

I did find as the months went on that I was attempting more challenging ideas, often taking quite a bit of time to get right. Such as getting mushroom bokeh shapes in the background bokeh and trying creative lighting. This Hedgehog mushroom below really needed a bit of creative lighting to help show off the wonderful details. This was a stack of 65 images and required several lights.

 The image below is a focus stack where I held a mushroom in front of the lens to obtain the mushroom shape in the bokeh 


Then there is this puff ball image, which is a stack of 31 images, composited with the spores from me pressing the backs of the puffballs with floristry wire etc Definitely a technique I need to work on more

So as you can see I have progressed but still have lots to work on to improve, but its a fun journey

I have entered a few of these images into International garden photographer of the year in the mushroom category and the portfolio category. Watch this space for news on whether any get placed


Tuesday 23 November 2021

Still life progress and success with IGPOTY

Following on from my previous blogs re Still life photography ( see July & October 2020 plus Feb 2021)

I have continued to experiment and try to develop my own take on still life photography. This year I have concentrated a lot more on lighting as well as aiming to improve compositions and coordinating the set ups that I create.  Yet again I have thoroughly enjoyed immersing myself in this genre and found it a most useful pastime during the months where we were required to stay home more during lockdown. Spurred on by my previous success of a highly commended image in IGPOTY ( International Garden photographer of the year), I yet again aimed high, hoping to get another image placed in the competition this year.

ABOVE A summer fruits and wildflower still life - using colours to pull it together

This summer I created a couple of home made Gobos out of cardboard, these are simply a piece of card with shapes cut out so the light and shade hits my background or subject the way that I want it to. I mostly used a couple with squares cut out so it appeared as if sunlight was streaming through a window that was split into squares ( apparently called a Muntin). My challenge was to light by subject in the way I wanted whilst also getting the gobo lit backdrop, all in a small room - this was EXTREMELY challenging, with all sorts of things balanced around the room to keep my Gobo in position, to block the Gobo lighting affecting my still life scene negatively, whilst using Flags to stop light bouncing in certain places and reflectors to help bounce light back into the scene etc.

Above - A simple Summer wildflower still life setting, making use of crinkled paper to go with the crinkled Poppy petals I used back/side lighting to light the Poppy petals up, allowing it to also fall on the strawberries

This year I aimed for a bit more of a themed approach to many of the still life images I created, choosing to use mostly wild flowers that most people can obtain easily, many from our own gardens.
My reasoning was to be able to pull together a portfolio of 6 images to enter into IGPOTY and as I am also considering  subjects for possible Fellowship panels I decided this could be one of two subjects I would work on this year with the Fellowship aim in mind. Last year we had decided to plant lots of wild flowers in our own garden to help wildlife and the environment, so I had access to quite a few.
 I had also built up a small collection of vases, ornaments, dried items from nature, other props plus materials to use in the fore and background.

ABOVE Using a GOBO for the lighting, a mushroom I made from Polymer clay specifically for my still life photography, adding snail shells for extra interest and textures in the vase plus muslin.


Once I had my set up created I usually found myself starting with adding my first light from behind and to one side of my subject ( even though I only had about 2-3ft of space behind) this was often using a gridded diffuser to keep it directional. This kind of created a little bit of a lift to my subjects, helping them stand out more, but keeping this light coming from the same side as my Gobo so that it would appear more natural. Once I was happy with the light hitting the back and side of my scene, I would add my second light - often through the Gobo. This light needs to be a small source so I used a speedlight, unmodified. Again, space was an issue - I only had about 1-2ft of playing room to move my light within, plus balancing the Gobo in precarious positions whilst trying to keep it outside of the scene. Sometimes I would only use this light to hit my backdrop, other times I wanted it to hit my subjects as well. Even with these two lights the whole scene was often not fully lit how I wanted. For most sets lit this way I needed to introduce reflectors to bounce light back into the shadows and/or a 3rd light. My 3rd light was usually modified with a white shoot through umbrella pointed away from the scene and towards the white ceiling or walls to bounce just a small amount of light in to lighten the whole scene slightly, reducing shadows too. With all the lights it is crucial to note if any are causing unwanted reflections or glare off any shiny, wet, metallic or glass item which can be distracting. In the middle image below you can see a distracting glare on the jug caused by introducing a 2nd light, this was easily resolved by moving the muslin material. Another way to help reduce glare is spraying hairspray or specialised photography spray on the surface - I use a very light spray of dry shampoo sometimes. The series below is an example of how things can progress as I build lighting and sets/composition.


ABOVE Using grasses and root vegetables, I liked the colours, shapes and textures so tried to make the most of those with my lighting.

Looking back on last years images compared to this years, I can really see a difference in my approach. Now I am using lighting to focus attention on the details that I want to stand out - at least in many of the images. I will also take a lot more time in creating a set, putting a lot of thought into what subjects I want to use and why, the composition and relationship of the items to each other, the textures, colours, shapes, vessels, materials, background. I am paying attention to the tiniest of details and can sit in our dining room / mini makeshift studio contemplating my scene, changing things around and altering lighting for long periods of time, often leaving it and returning to the project the following day. This suits me nicely, having so little energy, I can spend just a few minutes at a time faffing and rest, there is no rush as little will change over the course of a couple of days providing my flowers are watered and kept well. 

ABOVE This image demonstrates for me how my approach to lighting has changed, taken last year, it was one of images I was most happy with then. It is pleasing enough but I think i could improve on it so much now by changing the lighting. Never the less it still did well in two competitions. NOTE I used dry shampoo sprayed on the pewter vase to reduce glare in this one.

After playing around with all the points mentioned above, I did manage to pull together a portfolio of 6 images which I have entered into IGPOTY Portfolio category this year and will eagerly await the results - usually announced in February the following year. I did also enter a few single images into the IGPOTY Still Life category and I was thrilled to at first discover that I had 7 images shortlisted. I was even more overjoyed when the winners were announced! 

Imagine my delight when I logged on to the winners gallery and saw one of my images at the top of the page in first place! I was quite surprised and even more taken aback as I scrolled down the winning images to learn that I had images awarded 3rd place, finalist, highly commended and 2 commended!!!!
I was in complete shock - 6!!! images placed in that one category and the overall winning image! I still find it hard to believe. It just goes to show what can be achieved from messing around in your dining room, using flowers that many consider to be weeds. I hope my results might inspire others to try out different genres and entering competitions, if I can manage this as an unwell, disabled person then Im sure most others can too. So here are my winning images :)  IGPOTY STILL LIFE WINNERS

Watch this blog to see how my portfolio does in the competition and to see how I progress in pulling together a possible Fellowship panel ( also see my next blog on Fungi photography - the other subject I have concentrated on for a possible panel and entered into IGPOTY)


Friday 14 May 2021

Mindfulness and photography

Why use photography as mindfulness 


A brief couple of paragraphs explaining why I have started focusing more on mindfulness and applying it to photography.


 Recently I have commenced a new health programme to correct a few imbalances and nutritional issues in my body that may be causing many of the symptoms associated with M.E./Chronic fatigue syndrome which I have had for 14-15 years. My health professional has a wonderful holistic approach despite her main focus and expertise being in nutrition, which is very much in line with my own approaches. As part of the new health plan I spend time outside in nature to compliment my circadian rhythms and aid sleep, follow a complex nutrition and supplement protocol ( gluten free, dairy free, low sugar, low alcohol, low lectins, low oxalates) plus work on practicing mindfulness and stimulating my vagus nerve. In people experiencing M.E./CFS it is thought that a dysfunctional autonomic nervous system (ANS) could be causing many symptoms such as sleep issues, cognitive difficulties, inflammation and pain. People with M.E/CFS are said to have a low vagal tone and increasing this is thought to aid in reducing symptoms. These mainly involve techniques that induce the relaxation response which, over time, affects autonomic nervous system functioning. More in depth info is on the ME association for anyone who is interested. Self help measures that help to increase vagal tone include - Deep breathing exercises ( check out Wim Hoff the ice man - fascinating), Mindfulness, Meditation, gentle aerobic exercise such as yoga, massage, acupuncture, cold (showers), sunlight, laughter, healthy eating. 


 In the last couple of months I have found myself more and more drawn into learning about mindfulness, which has led to exploring spirituality and meditation, even a bit of yoga. I started by reading books when my brain fog would allow, watching a wide variety of videos on you tube and listening  to guided meditations. I've tried all sorts from Wim Hoff's intense guided Deep breathing, to sleep hypnosis, very gentle guided yoga, and a programme of ten minute mindfulness exercises to be practiced daily. So I have proceeded along a new path of self discovery quite by accident. I have found deep meditative states that I can only describe as bliss, a more peaceful way of being and I have been left questioning all that I do, including photography.


 I get out to try a little photography an average of once a week and lately I have had some very set ideas in mind that I specifically wanted to attempt producing, with end results in mind. However, things don't always go to plan -sometimes wind or sunshine ( or lack of it) have affected my plans, other times my cognitive functioning, fatigue, low energy levels have resulted in me forgetting something crucial in the process, making schoolgirl errors etc - its not easy when your brain does not function fully, or equipment has been a little off! Consequently I have repeatedly been disappointed with my results, usually knowing I could do better if my brain and body were functioning better - I don't like being negative so tried hard to brush it off, but underneath the frustration and struggle is real as I only get to try once a week and that's my energy gone, all used up and having to rest for days afterwards. 


 Luckily I love the process of taking photos, whether they work well or not, I have often said that photography is my own therapy, my own form of mindfulness. I enjoy planning for it, getting things ready, scouting locations, planning lenses or lighting etc and any accessories or people involvement. This is where the mindfulness ties in, I realised in the midst of practicing and learning about all these meditative techniques and my frustration following my difficulties producing what I wanted in photography and realised that I need to step back a bit, applying mindfulness to my photography in a different way.


 So I am setting out to simply take my camera and lenses out with me without preconceived ideas, aiming to be totally engaged in the present moment, to take in what is around me and try to look at things in new ways, applying the techniques I have picked up over the years. My plan is to simply enjoy the peace and beauty of nature, the natural wildness and attempt to capture some of it in photographs, without judgement or pressure. I will be combining this with short spells of meditation, totally immersing myself in my surroundings, whatever the weather, relaxing and being totally relaxed yet uplifted by nature. Hopefully this will shine through in the images that I produce.


 I started in my garden, sitting and lying looking at the plants, insects and birds. The sun was shining through the undergrowth, peeking through and causing the surface of our pond to sparkle with the colours of the plants beyond. I chose a couple of crystals to give a similar feel and used a shallow depth of field to provide a more ethereal look, closer to what I was experiencing. These are not what I would call good compositions but closer to what nature was presenting - you cannot control nature.


 This is a different approach to most of the photography I have done lately, often at home, I have been trying to produce specific type of images with a purpose in mind - often for competitions, which has been my main driving force. I wonder if my new interest in mindfulness, meditation and spirituality will change my reasons for doing photography, or entering competitions, if it will affect what I produce. It will be an intriguing path to follow and may help me see things through new eyes. Watch this space.


Here are a selection of images taken on a recent trip to a Bluebell filled woodland where I could not move far due to mud on the paths ( my mobility scooter kicks up a fuss in mud!). I had planned to simply photograph some close ups of Bluebells, but the light was so beautiful that I felt compelled to capture it. Here I did sit and absorb the sights, sounds and smells, being one of the most beautiful sights of the year for me ( missed last year due to lockdown restrictions). All 3 images below were taken within about 20 ft space. A family were out with their dog and I grabbed the opportunity to capture the moment.


 I would like to add that in the months following this approach that I have progressed from being in moderate pain pretty much  99% of the time to only having normal aches and pains. I am fairly confident that this is as a result of reducing both lectins and oxalates in my diet, but know that mindfulness is helping me to address residual pains effectively. Its early days yet, but this is a very promising sign.


Thursday 4 March 2021

Textures how to use them and how to make them

  I adore seeing images with painterly, ethereal appearances, where photographs and textures are carefully meshed together to create a masterpiece. I have dabbled with using textures in my imagery ever since I started getting into photography. Firstly, the son of a friend helped me to learn how to create digital signature images  for use on internet forums around 18 years ago. After this I practiced blending layers together to create signatures tailored to individuals, then moved on to creating textures for my photographs. 

 Below are a couple of  my old photographs where I first used textures. You can see they are quite basic, but the sunflower one remains an old favourite. These are both from around 2008.


The next images show how my blending and layering techniques evolved over the following years as I learned from fellow photographers on Ephotozine and DeviantArt. Most of the textures I used then were free downloads off DeviantArt, Flickr, Ephotozine and similar sites.


As you can see I started out my photographic journey capturing flowers a lot, something which I have recently got back into. But I also used textures with other genres such as portraits.


 As I started entering competitions I discovered that it was important to use my own textures in my digital manipulations in images that I intended on entering to certain categories/competitions. So I started learning how to create my own textures. I first started by painting some card with watercolours then photographing those. I also photographed various textured surfaces such as walls, stone, wood, paper and manipulated these in photoshop.  I still have the painted textures and sell these as one of the texture packs that I have put together. 
 
This was one of the first textures I made, which was originally from a photograph of a stone quarry near where I lived. 


This is one of my latest texture collections - I have many available, a lot available on my Deviant art stock account A68Stock  or in my Etsy store AngiWallaceCreative Etsy store or by contacting me directly on Facebook Angi Wallace Photography,  or by email - angiwallace@live.co.uk


This image of a Crocus was created with just one of my own textures, I altered the colour of the texture to get the glowing blue/lilac colour that I wanted.


So how do I use textures? 
If new to textures - To use in photoshop ( Ive started with basic simple instructions for those who are new to using textures)
Open the photo or artwork you wish to apply your texture to
Then also open the texture you wish to apply, with this texture open click on Select then All, then click on Edit at the top of your work space and choose copy from the list,
then go to the photo you are applying it to, go to Edit again and choose paste. Now you will see the texture appear over you photo. So below you see my original photo open in photoshop.
You should have a Layers panel open ( mine is bottom right of the screen) where you can see both layers in a panel - each layer will have an eye icon next to it for you to choose whether you want it to be visible or not. Your photo will automatically be named Background layer and the texture will be named Layer 1 unless you choose to alter the name. In this Layers panel you need to click on the texture to choose that layer - this will highlight the layer within the panel - so anything you do following this will apply to that layer.

Within the layers panel you will see a dropdown list starting with "Normal" - this list is of blending modes - in the Newest version of Photoshop you can hover over each blending mode and it will show you a preview of how that blending mode will affect the layer, each will give it a different appearance. Scroll through these and find which blending mode you prefer and click on it - it will be applied to your texture layer giving the image a different look. 

Also within the Layers panel there is an Opacity option where you can reduce the opacity of the layer for a more subtle look. I often reduce opacity.

 I find it useful to select areas of the texture, feathering it and reduce the opacity by using masks, this is particularly handy when you want a particular subject in your photo to show throw more prominently.
To start this process you will need to choose your texture layer by clicking on it in the layers panel - you will know you have done this right when the layer is highlighted in a lighter grey within the panel. Then click on the Layer mask icon  at the bottom of the Layers panel ( it is the white rectangle with dark grey circle within) When you click this a white rectangle will appear in the Layers panel next to your texture - this is your "layer mask". It will be surrounded by white corners showing you that it is selected. See below screenshot.

What is a layer mask?
Basically whatever part of your mask is white is what you can see of that layer, whatever you paint in black  using the brush tool over your image will be removed from view. So in my image I want to see the bottles and flowers with less texture on them. I start by loosely selecting the area around them using the lasso tool from the top left of your tools. Do this by drawing around your subject and you will have an area selected by flickering with dots ( often called marching ants). 
Now because this is the area we want removed and we do not want a harsh line of where texture starts and ends, we are going to feather the edges of this selection. This will help give the image a better blended appearance when finished.  So go to "Select" in the top options and scroll down to "Modify" and another few options will appear - choose"Feather". A small box will appear asking how many pixels you want to feather by. On my first layer for a full size hi res image I tend to start by feathering a lot, so chose 300 pixels for this image. type in your chosen number and press ok. The selected area surrounded by marching ants will shrink a bit. 

Next we need to fill this selected area with black. Make sure in your layers panel that the texture layer is highlighted grey and the mask has the white corners. Then from the top options choose "Edit" then "Fill". A new box will appear asking what colour - we want black. Also what percentage, I choose 50% for my first layer as I remove more in my  next layer. Then click ok. Then click Select and "Deselect to get rid of the marching ants.  
For this image I am using a normal blending mode so had my opacity reduced to enable me to see  the bottles and flowers. Now that I have masked out my first area I can change my opacity back to 100% to get an idea of how it is looking. As we can see below there is still some texture over the bottles/flowers.


Following the steps above again we select smaller areas and feather these a lot less - say 100pixels, so starting with the bottle on the left I select an area smaller than the bottle itself. ( again make sure the texture layer is selected and the mask selected before filling this area with Black at about 75% this time. Deselecting and repeating for each bottle and flower. If something is very small then feather less pixels.  Soo after masking these little areas my image looks like this below.

You could your image like this  or mask out less than I have, this is totally up to you and depends on the look that you want. But for a further step, if you want texture removed accurately or completely from some areas then choose the brush tool on the top left and choose the colour black to paint with - checking the size of brush, whether it has a hard or feathered edge and also the opacity. Making sure your texture layer and mask is still selected you can start painting over the areas you want to see more of such as the flowers, using your brush. I often start with a lower opacity and build this up.
Below is my final image and you can see my mask in the layers panel showing the darker areas of texture I removed. This is just one of the ways I apply textures. There are other approaches too. You can use several layers of textures to build up your look. You can automatically select your subject in newer versions of photoshop or use the "select and mask" option, but this can leave harsh edges between your subject and texture which may not be what you want. There are also other options for refining edges. But this is just a basic starting point for those who have asked me. Please to get in touch if you have any questions and I will try to help


Other examples of my images with my textures applied below 

I should add that I use a Wacom tablet for all editing. I find it easier to select and paint areas and find it invaluable for editing. I have used Wacom tablets for over ten years after winning one in a competition and wont be without one now. 


I have been asked many times how I produce my textures and my techniques vary. The two textures above were simply photos taken at home - Chalkboard was a photograph of a set up for still life, where I painted an old board at home with black matt paint then sponged on white and grey areas, photographed deliberately out of focus for this effect. The second one is a similar painted, textured board simply desaturated with colour changes.
I often take photos that are deliberated out of focus to use as colour wash textures or to combine with a photograph of a textured surface. 90% of my texture photos are taken at home or in the garden. For out of focus textures I can use anything from flowers, grass and foliage outside, to the sky, a glass vase, material on clothing, curtains, bedding, bokeh from fairy lights, our fish tank etc Only your imagination stops you coming up with ideas here. For surface textures I can use standard photographs or macro photos of virtually any surface in the house - cracked leather on an old seat, crinkled paper stained with coffee, marble works top/fireplace, floor tiles, carpet, various material,l leather on boots and bags, lichen on a plant pot outside, a rusty old bolt, an old baking tray, bottom of a pan, walls, bricks, any painted surface, wood. The images below are simple snaps at home that will make wonderful textures/overlays.

This one is a simple out of focus flower photo which I have already used as a backdrop of overlay.


I find that combining my photographs helps in creating new textures, using blending modes, opacity and sometimes distorting them. Another tool I use is Topaz studio software which has a whole host of options for manipulating your images, many of which can give a lovely painterly appearance. You can download a free months trial to try it out. 


If you don't have the inclination or time to create your own textures then I have lots of different texture collections for sale starting at just £8 for a collection of 9 or 10 hi res textures.
They can all be found on this website Angi Wallace Creative Textures , but unfortunately cannot be purchased there yet as I am not earning enough from them to cover the cost of using the website as a shop. If I start to sell more then I will hopefully be able to make them available this way. In the meantime please email me and I will usually respond within hours. angiwallace@live.co.uk

I hope this has been helpful and would love to see your results. 


Blessed Ostara and submerged flowers

 I am still tinkering away creating submerged floral images and thoroughly enjoying myself. Lots of people have been in touch asking questio...